
Welcome to one more of my lazy tutorials for lazy DevOps! Here we’ll make integrating the new Meta Llama3 with Streamlit as straightforward as pie. This guide is designed to get you up to speed in just a few steps, without the usual hassle.
I always hear from engineers about how they’re itching to dive into AI but just can’t find the time. So, this article is intended for all the time-crunched DevOps and engineers willing to learn something about it and at least put something to work by themselves – this guide skips the fluff and gets straight to the fun stuff. You can always study by yourself to understand the parameters of things or If you’re curious about the ‘whys’ or need a deeper dive, I’m just a hire away!
1 – Let’s Start at the Very Beginning: A Very Good Place to Start!
We will use a guy called Ollama! let’s install this great tool by doing this:
curl -fsSL https://ollama.com/install.sh | shGreat, did I mention that we will be using Linux? Ok. You can check that link above for windows or Mac Installations. No drama.
Then, after the installation:
ollama pull llama32 – Let’s install additional required packages! I hope you have python already installed!
It’s always good to upgrade your pip first!
pip install --upgrade pipAnd then:
pip install langchain streamlit langchain_communityGreat! We have all the libraries!
3 – We need some code!
Well, let me do that for you. copy this and paste into a file named chatbot.py:
# chatbot.py
# Import necessary modules
from langchain_core.prompts import ChatPromptTemplate
from langchain_community.llms import Ollama
import streamlit as st

# Define a prompt template for the chatbot
prompt=ChatPromptTemplate.from_messages(
    [
        ("system","You are a helpful assistant. Please response to the questions"),
        ("user","Question:{question}")
    ]
)

# Set up the Streamlit framework
st.title('Langchain Chatbot With LLAMA3 model')  # Set the title of the Streamlit app
input_text=st.text_area("Ask your question!", height=300)  # Create a text input field in the Streamlit app

# Initialize the Ollama model
llm=Ollama(model="llama3")

# Create a chain that combines the prompt and the Ollama model
chain=prompt|llm

# Invoke the chain with the input text and display the output
if input_text:
    st.write(chain.invoke({"question":input_text}))
4 – What about start running it?
Remember, we are using a good toy called Streamlit! Therefore, this is how you run this code:
streamlit run chatbot.py When it starts, it will ask you for some email. You can just skip it and press enter. Or you can put something like “master_of_universe@domain.com”. That’s up to you. You will see a local address showing up, suggesting you to open it in a browser.
Like this:
You can now view your Streamlit app in your browser.

Local URL: http://localhost:8501
Network URL: http://xxx.xxx.xxx.xxx:8501
5 – Let’s open it! This is what you will get in your browser:

6 – Let’s try something inventive!
Let’s type this, for example: “Please create a code of a 3D cube plotted in python!”
And then, ctrl+ENTER.
Wait for the result and look how nice it is (maybe because I used “please” in it):

Optional step 7:
Create a python file with any name you like, copy this content and run it. In my case, this is what happened:
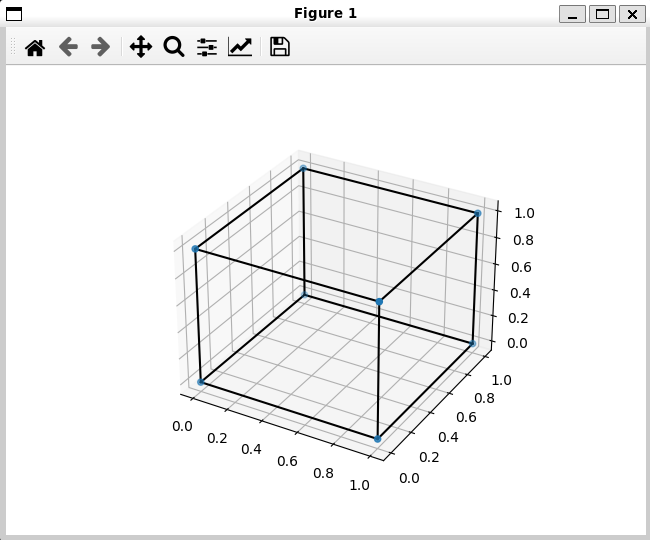
So, it created a fully functional code to me! It might work well for you too (maybe you also have to use “please”).
That’s it, thanks for your time and enjoy your new journey!
